Update:
Overall it's working fantastic. Super quiet and I can tell it's super efficient already. It's been pulling a measly 500 watts. And very even heat.
Called Home Depot and they instantly credited the Price difference, so the unit cost me $165.00 (after rebates, NH rebate already submitted). They are out of stock on the 18K unit.
Unit is working perfect. Weeks ago, I thought it was gonna be in a race to get A/C going because it was getting pretty hot. But I've had the heat running all this weekend with it and it's been flawless.
Wireless works great, can control from anywhere and it even has a Freeze Protect mode that will keep the house above 40F.
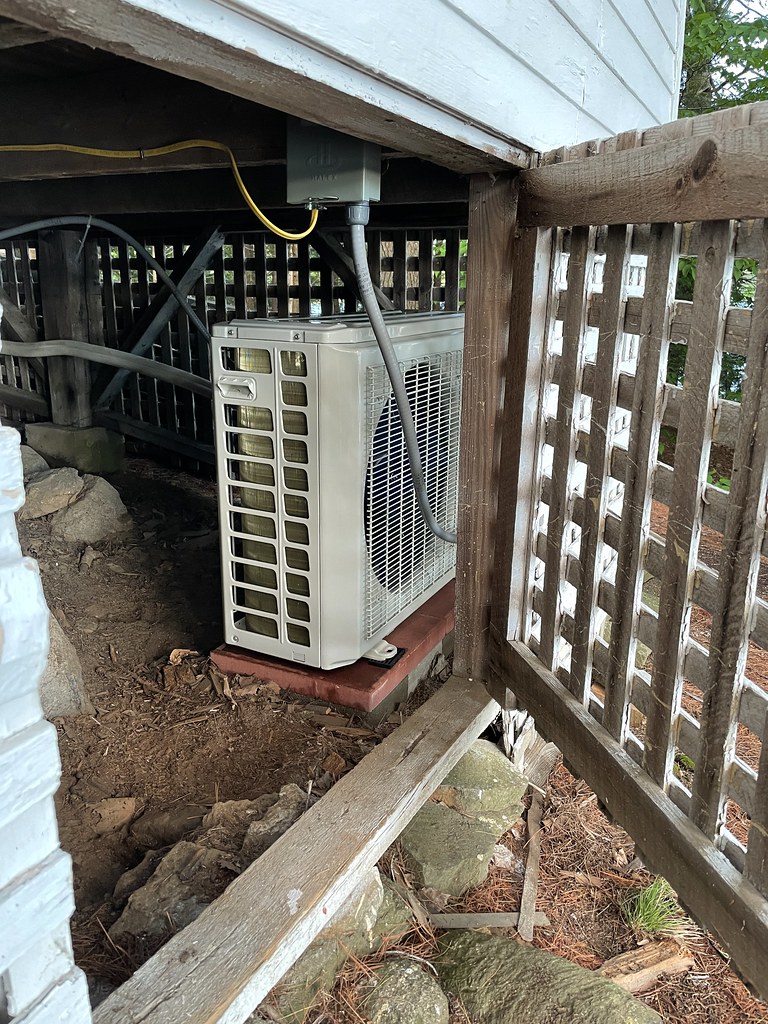
I still need to dress the outside with a "Hide" kit for lines coming down. I mounted the outdoor unit on 4 patio blocks.
Now, if I had a fancy house, I'm not sure I'd get this unit. It's no Mitsubishi. But I'm not sure I'd even get any mini split if I had a fancy nice house. Even though the unit is exceptionally quiet, it's not silent. It is quieter than my old Force Hot Air system in MA. But it not as quiet as my super efficient Force Hot Air (and AC) that I replaced it with. But for a 3 season cottage it's perfect.
I'm a detailed person that likes to share what I learned. Don't freak out over the length or the dumb mistakes. You get to learn from my goof ups which were not that bad. I have no regrets doing this myself. I bought a few more things than needed and not used that I plan to return.
Some tips for installing:
Directions were pretty horrible.
1) Warning, the wall unit is PRESSURIZED (probably nitrogen). You could see this special white cap with a red button on the line that hinted at it. Kind of like the Pop out Turkey Thermometers. I pressed the end expecting it might release it and it didn't. So I started to unscrew it. I could hear gas coming out slowly. I was thinking it was not that much pressure (and probably wasn't). But rather than let it leak out slow I unscrewed it all the way. Big mistake. What a loud pop. My ears were literally ringing. That was a dumb move. Nothing about it in manual, no warning tag and no mention in Videos I watched.
2) They don't give a template for the wall unit. Just measurements in a itty bitty diagram. Probably 2-3" in size. And really poor references of where to measure off where you are gonna drill the 2.5" hole. So I mounted the unit temporary on the wall (not fully snapped in). I was way off where I marked the wall. I made a stupid math error adding instead of subtracting measurements off the diagram. I re-taped the louver and cover on before I lifted the unit off the wall bracket and as I did the unit "snapped in" to place. No problem I'll just unsnap it. It would not budge. Look in the manual on how to release, nothing. Look for videos nothing. I pull and pull thinking it's just a friction thing. Ok, now I'm starting to lose it. One side released the other side bent the wall bracket. After that I see how to release it, there are two holes on the bottom and you have to hook the plastic and pull down while pulling unit away. I took a picture. It was easy bending bracket back.
3) Remarked the 2.5" hole and drilled it (no test mount this time). I used foil tape (love this stuff) to tape the flange to the tube and the tube to the inside wall. So it was all real tight and firm. Snap the unit on while feeding lines through wall. It was snug where the hole was relative to where lines came out.
4) Now to run copper "twin line". The hole through the exterior wall comes out to a wrap around covered porch. Under the porch is dirt and stone and sloping up to where the line has to go through the porch floor. I get it all in place and the line connections from wall unit are staggered by like 2". But the Twin line connections are side by side. So I put a big gentle S in one twin line to take up the slack. A pro would cut the line and re-flare it. No way I could match the machined flares. So I roll the other end out and I have about 2 rotations left and I see the connections are staggered by 2". Smack on the forehead. Nothing is marked or tagged or mentioned in the manual. Pull the whole thing out (on my belly in musty dirt mind you). I get it out and unroll the last two turns. Guess what, the fittings were even again (they were staggered because of the coiling). Double smack on the head.
5) Get it all laid out and wrench tight all the lines. On the web they recommend Nylog. I think many folks use it wrong. The idea is you want the flare nut to slide on the back of the copper flare so that lines don't twist as you tighten them. I think that's where you should lube it. Many folks put it on the mating surface. That can cause the line to twist when you tighten it down. I saw one line twist some out of the 4 and I took my chances dry. I didn't have the NyLog when I cranked them down.
6) Now ready for the pump down. I bought a pump kit that stated Refrigerant 410A compatible. The fitting you needed was the wrong thread. Had to order another one.
7) They wanted you to crimp on lugs on the wires between wall and base unit. I tried two types and just could not get them to fit. So just ended up using the bare wire. I think it's fine. There is only 3A max on the wall unit.
7a) The twin copper line is 25ft. And the wall unit has like 3ft lead copper tubing so you have 28ft. But the wire is only 24ft !!
8) The electrical cover on the outdoor unit is TWO pieces and they installed the self sticky gasket across the two pieces. Morons. The gasket belongs stuck to the main unit and you install half the bracket to the unit, attach water proof connectors to that, then the final cover (i.e. one half at a time). I shredded the gasket trying to salvage it. I know they screwed up. Thinking they saved time in assembly in factory but not understanding the order things have to go together. Good thing my unit is out of the weather. Easy fix if it needs to be water tight.
9) After looking at the gauges I received with the pump and the wrong thread adapter. I watched a couple more Videos. And realized the manifold gauges were useless for evacuation (although some people use them, incorrectly). So I bought a really nice vacuum gauge (Testo, used on Amazon Warehouse). The correct adapter. Nylog (just in case) and a KWik-E-VAc (partly as backup). And a leak detector. I never used these last 3 pieces.
So I start the pump down with the nice gauge and correct adapter. The correct adapter has a thumb screw on it to control the Schrader valve on the main unit. You turn that in so it's open (two way). And start pumping. It was below 500 microns in 20 minutes. Manual states below 500 for 30 min. It was down to 172 microns in 40 minutes and plateaued so I let it pump for 20 minutes at that level.
Now I want to leak check. Oh Crap. I don't have a valve between the pump and the vacuum gauge. If you shut the pump off it will let air back in. Then I tried closing the Schrader, disconnect pump, cap meter and open Schrader. Even if I lost some vacuum I thought I could still check if it's rising. Didn't work. I was at 10,000 micron when I opened the Schrader back up (depressed pin with knob). Pumped it down for 1 hr again. Then it hit me why that didn't work, because the Schrader will let high pressure IN. But then I realized a simple trick, all I have to do is close the Schrader (pin not depressed) with pump running, wait 10 minutes or so and then open it up (push Schrader pin in). If there is a leak in the system the gauge will rise (because air could get sucked in through a leak in the system, higher pressure). There was no leak !! Not found in any videos or in the manual. I used to program controlling very high vacuum systems.
Also note, I probably would never have reached 172 microns in the first place if I had any leak.
I was so confident that the system was tight and evacuated I decided to not use the KWIK-E-VAC because that required opening a connection (the one that I saw twist when I wrench it down). It was risky untwisting and then potentially twisting it again. If I had it to do over again I might have used KWIK-E-VAC first. I'd never want to use KWIK-E-VAC alone (Which is what it claims you can do).
Now here is another clever part. Not in the manual nor in any videos. You leave the pump RUNNING. If you shut the pump off you'll let air in. Even if you close the Schrader (not depress the pin) and remove the pump you will still let air in. The Schrader let's higher pressure in NOT out when the pin is not pushed. When the pin is pushed it's two way open. So you leave pump running (after pump down) and close the Schrader valve (pin NOT depressed). Both sides are equal pressure (assuming no leaks). This is the same state as the leak test above. Now the moment of truth. You open the refrigerant valve. That puts POSITIVE pressure on the system side. But positive pressure can't get through the Schrader (that's the whole reason the Schrader valve is there). Now you can turn off the pump and remove lines. Never let any air in or refrigerant out.
One mistake I might have made, and I bet many pros do too. Many of these systems have small heaters in them to keep the compressor oil warm. Warm enough to "boil off" the refrigerant that can condense in the oil. That can ruin the compressor. I should have powered up, but NOT RUN it for 24 hr's to be safe. But I forgot. There is no mention of this in the manual. But they do hint to KEEP THE UNIT POWERED if you plan to use it in the winter, which is a hint that it has a "safety" heater in it. It has nothing to do with keeping oil viscous or anything. It's to stop refrigerant from condensing in the oil. I figured this out by examining all watts being used in my home and noticed my A/C was using fair amount of watts when idle, in the winter. Most modern A/C's have this.
It's kind of neat having it under the porch.

This is the valve you need with the thumb wheel to control the Schrader valve. You do not need a Schrader removal tool.
Do not get a straight adapter, you either will leak air in or refrigerant out if you use a straight adapter (which pushes Schrader as you screw it on).

This is all you need, a pump, a vacuum meter (this is a rather fancy one) and that valve. You can leak check too.
But how do you find a leak? Here is a trick I learned at work. If you have a leak mist water on each connection. If pressure shoots up, that's where your leak is


This is where they messed up the gasket. Half the cover is mounted holding the lines. Then you put on the final cover. But the two pieces were "glued" together with the gasket. Gasket should have been put on the unit (which I tried to piece onto it and failed).

You can see the far side has foil tape on the inside. I also foil taped it to the wall (picture is before I did that).
