I'm happy to share my procedure. I'll include it here in case it can also help someone else, or if you have some questions.
I believe this procedure will only work with water that recently got into the tank and that the gasoline is relatively fresh (not stale). I don't think it will help much if your gasoline has suffered 'phase separation' (Google it if you need to).
First and most important, always remember that you're working with gasoline, and the fumes are heavier than air, and
explosive. So be sure to have everything turned off on your boat, the blowers on. Be careful not to have anything that can cause a spark, including static electricity. If you don't know what this means, or not comfortable working with the gas and fumes it can create, don't try this procedure.
I did this myself with my boat in the water.
The best way to get access to the inside of your fuel tank to remove the water is probably via the fuel level sender. Don't try to use the fuel fill pipe or vent pipe as you need to see into the tank. Opening the sender will allow you to look into the fuel tank, which is key to this procedure.
Find the fuel level sender and its mounting plate on your tank. Hopefully it will be in an accessible location to
allow you to look into the tank through its opening. If you can find the fuel sender, but its not in a location that will allow you to look into the tank, don't try this procedure, as I'm not sure if you can do the job properly. As you read the rest of this you will see why
you must be able to see all the way to the bottom of the tank via hole for the fuel sender.
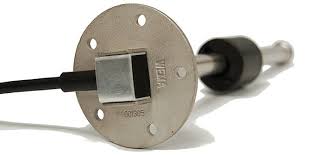
The fuel level sender may look like, or similar to one of these:


On my boat I had to remove parts of a cabinet by unscrewing things, and remove an ice maker. Then beneath a mounting plate for the ice maker was an access port. Beneath the access port was the fuel sender. Yours will be totally different, but most boats allow for access to the fuel sender in case it needs to be serviced.
Mark the position of the fuel sender before you remove it, draw a line across one side of the fuel sender and extend the line onto the top of the tank. This may or may not be important, as some senders can only be installed one way, but to be sure, use a marker so as to be able to re-install the fuel sender into the same position as it was before you removed it.
Before you try to remove the fuel sender, get yourself a replacement gasket kit for it. The gasket kit will include a new gasket and gasketed cupped washers and screws. You don't want to start this without a new gasket to install when you are done. I've seen these available at Fayes, but most any marine shop should have them.
To remove the water from the tank, I used a non-metallic gasoline proof pump. If it's a hand pump, it will take you some time to pump 55 gallons, but at least you can do it safely without sparks. I used a pump like this one:
http://www.walmart.com/ip/Mityvac-MV...-Pump/41281696
I liked that it was non-metallic pump, and it was manual so there was no chance of creating a spark. Others told me to use an old electric automotive gasoline fuel pump, but I didn't want to chance any sparks as I turned it on or off. You also want to be careful of static electricity. So a humid summer day is best for this procedure vs a dry winter day.
To help with getting every drop of water, I also used a 3/8 copper tubing that was about 3 feet long (I got this at a local hardware store). This was attached to the end of the tubing from the pump. Being mostly rigid, it allowed me to use it as a wand to get to different spots into the tank though the fuel sender opening without trying to fight with the floppyness of a piece of flexible tubing.
I also purchased 12 5 Gallon gasoline cans from Walmart to allow me to hold the gas as I removed it:
http://www.walmart.com/ip/5-Gallon-A...e-Can/41080329
I got 12 of them, and returned the ones that I never used (Don't try to return any if you used it, they won't accept it if it was used at all).
As I thought about how to find and rid my tank of water, I remembered that water is heavier than gasoline and will sink directly to the bottom of the tank. Thinking about this more, and knowing that food coloring is water based, I thought 'bingo', I'll get some food coloring and use that to color the water to make it easy to see. I tested this idea and was surprised at how dramatically it allowed the water to be seen separately from the gasoline. There was no doubt about seeing the water!
Here's the secret sauce: Go to a local grocery store and buy a small bottle of black food coloring, since we're shopping at WalMart here's a link, but you can get this as most any grocery store:
http://www.walmart.com/ip/McCormick-...Color/10309022
Get all of your parts together, some fuel cans, tools, and paper towels to pick up any drips. Shut off all your boat's circuit breaker switches, disconnect AC power, basically anything that could create a spark. I left my blowers on to be sure that no gas fumes would get into the bilge. Remember that gasoline fumes are heavier than air and can sink into your bilge.
Now remove the fuel sender and set it to the side. Don't bend anything. If the wires are not long enough, you may need to cut wires to it. In this case you may need a crimp tool and butt crimp connectors to put it back together, or if you are lucky there will be nuts or screw terminals to remove and replace.
Once the fuel sender is removed you have two choices. Your need to decide if you want to remove ALL the fuel, or try to only remove the water. If you think you can see and easily get to the lowest point of the tank with the wand that is on the end of the fuel pump line, then you can try to only remove the water. If you can't easily see the lowest point of the tank, then you should do your best to remove all the fuel.
Remember that water is heavier than fuel and will sit on the bottom or on the lowest point of the tank.
You may need a flashlight to see what you are doing in these next steps.
Here is where the black food coloring comes in! Drop several drops of the black food coloring (you only need a few drops) into the tank. Try to rock the boat a bit to allow the food coloring to find the water. If there is water in the tank, the water will take on a black haze and this will allow it to be easily seen.
If there is no water in your tank, the black food coloring will sink to the bottom and you will see it sitting on the bottom of the tank as a few black spots sitting on the bottom of the tank.
If there appears to be a layer of black, this is your water. Use the pump and wand to get to the water and pump it into a gas can. Try to get every drop. As you get all of it, you will see small droplets that appear to 'float' on the bottom of the tank. Keep in mind that some tanks may have internal baffles that may prevent you from getting to, or seeing every corner of the tank. A small inspection mirror may help you to see into corners of the tank, don't drop it into your tank!!
If you think you can remove all the black, then you are done and probably don't need to pump out much gas. But if you're sure, just pump out all of the gasoline into the plastic gas cans.
I filled 11 gas cans with gas. I then took them home.
I let them sit for a week without touching them to allow the water to settle to the bottom. Then I placed a few drops of the black food coloring in each can. With this, I was able to find every drop of water. I then siphoned out the water from each can into another can to collect the water.
Here's what the water will look like with a few drops of the black food coloring. The black is the layer of water inside of a red gas can. You're looking through about 2.5 gallons of clear gasoline (you can't see the gasoline in this photo as it is too transparent) down to about 2.5 gallons of water (which is now black):

When I was done, I had collected about 2.5 gallons of water. I brought this to my town's hazardous waste collection day for proper disposal.
When you are done, reinstall the fuel level sender using the new gasket kit and new cupped washers. Be sure that nothing will leak. If you had to cut any wires to the fuel sender, reconnect them using barrel connectors and a proper crimping tool. You should also double check this area after your first gas fills to be SURE that you have no leaks at this point. If you want to be double sure, perhaps pay a marina to do a pressure test on your fuel system to be sure there are no leaks.
I decided to burn the gas in the cans in my car. This worked well, no wasted gasoline.
I hope this helps. It seems like a lot of details, but it's not too bad in practice. Most of the time was spent using the hand pump. I think it took me a couple of hours to do this job. It is helpful to have someone to help you (hopefully no one that smokes

).
This procedure saved me several hundred dollars. A marine tech can do this for you, but it will cost between $100 and $150 per hour for their time. Then they will want to dispose of the gasoline, which will cost a bit for both the contaminated fuel drum and the hazardous waste fees. I also was able to recover all but 3 gallons of the fuel and burn it in my car, so no wasted money there.
Again, be careful! Gasoline fumes are explosive!
Don't forget to find out how the water got into your tank in the first place. You want to fix this so that it doesn't happen again.
Let me know if you have any questions.